Roof Hail Damage: What to Look For
Roof Hail Damage can shorten the life of your roof long before leaks become visible. Learning what to look for after a hailstorm helps homeowners protect their investment, prevent costly repairs, and make informed decisions about inspections and roof restoration.
- Roof Hail Damage is not always visible from the ground.
- Hail can bruise shingles, loosen protective granules, and damage flashing.
- Early inspections help identify hidden storm damage before leaks develop.
- Minnesota’s changing weather patterns, including stronger storms during some El Niño years, can increase roofing concerns.
- Professional inspections help determine whether repair or replacement is the better investment.
- Prompt action protects your home’s value and helps prevent additional structural damage.
Frequently Asked Questions

How can I tell if hail damaged my roof?
Common signs include missing granules, bruised shingles, cracked shingles, dented roof vents, damaged flashing, and dents in gutters or downspouts. Some damage is difficult to identify without a professional inspection.
Should I inspect my roof after every hailstorm?
Any significant hailstorm deserves an inspection, especially if hail is one inch or larger. Even small hail can damage older roofing materials.
Can hail damage cause leaks immediately?
Not always. Many roofs continue protecting the home temporarily even after hail has weakened the shingles. Leaks may appear months later.
Does every hail-damaged roof need replacement?
No. Some roofs only require localized repairs. The age of the roof, material condition, and extent of damage determine the appropriate solution.
Can hail damage reduce my roof’s lifespan?
Yes. Even when leaks are not present, hail can shorten the expected life of roofing materials by damaging their protective surface.
Why should a professional inspect hail damage?
Professionals recognize subtle signs of impact that homeowners often overlook. They also inspect flashing, vents, valleys, and other critical roofing components.
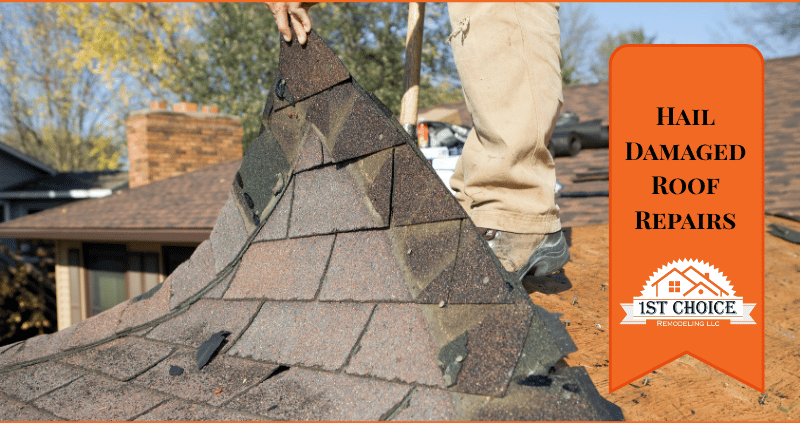
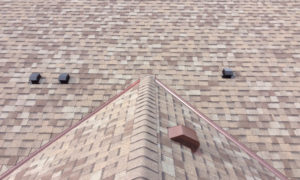
Roof Hail Damage is one of the most common reasons Minnesota homeowners need roof repairs or replacement. Unfortunately, hail damage is not always obvious. A roof may appear perfectly fine from the driveway while hidden impact damage slowly reduces its ability to protect your home. Because of that, understanding what to look for after a storm can help you avoid expensive repairs later.
In Ramsey and throughout the Twin Cities area, severe thunderstorms regularly bring damaging hail during spring and summer. Meteorologists also note that some El Niño weather patterns can contribute to increased atmospheric moisture and stronger storm systems across portions of the Upper Midwest. While no single season is identical, homeowners should remain prepared whenever forecasts call for severe weather.
Why Roof Hail Damage Is Often Missed
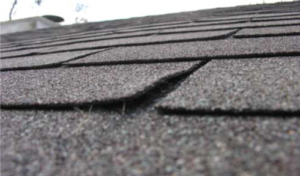
Most homeowners expect hail damage to leave obvious holes or missing shingles. However, hail frequently creates much more subtle problems. Instead of tearing through the roof, hail often bruises the asphalt layer beneath the protective granules. The roof may continue shedding water normally for months.
Unfortunately, every rainfall, hot summer day, and freezing Minnesota winter continues weakening those damaged shingles. Eventually, cracks develop, granules continue washing away, and water finds its way beneath the roofing system.
This delayed damage explains why many homeowners discover roof leaks long after the original hailstorm.
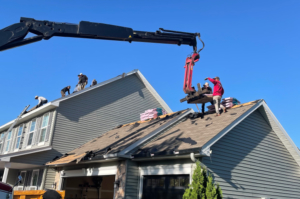
What Professional Inspectors Look For
A professional roof inspection evaluates much more than missing shingles. Experienced inspectors understand how hail impacts different roofing materials and where damage commonly develops.
They typically inspect:
- Bruised asphalt shingles
- Granule loss exposing asphalt matting
- Hairline fractures
- Damaged ridge caps
- Dented roof vents
- Damaged flashing
- Valley protection
- Gutters and downspouts
- Skylights
- Chimney flashing
Additionally, inspectors compare damage patterns across different roof slopes. One side of the home often experiences much greater impact depending on wind direction during the storm.
Granule Loss Matters More Than Most Homeowners Realize
One unique characteristic of Roof Hail Damage involves the loss of protective granules. These small mineral granules shield asphalt shingles from ultraviolet sunlight.
When hail knocks away those granules, the underlying asphalt begins aging much faster. Heat from the summer sun accelerates deterioration. Consequently, shingles become brittle sooner than expected.
This means a roof may continue looking relatively normal while quietly losing years of expected service life.
Why Older Roofs Require Extra Attention

Roof age significantly influences hail performance. Older shingles naturally become less flexible after years of exposure to sunlight and temperature changes.
During hailstorms, brittle shingles crack more easily than newer materials. Therefore, homes with roofs approaching 15 to 20 years old deserve especially careful inspections after severe weather.
Even moderate hail can create damage that would not occur on a newer roofing system.
How El Niño Can Affect Minnesota Storm Seasons
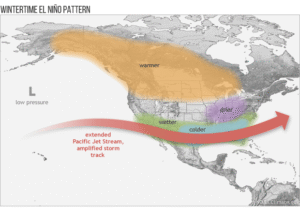
Homeowners often hear about El Niño during weather forecasts but may not understand how it relates to roofing.
El Niño refers to warmer-than-average ocean temperatures in the tropical Pacific Ocean. Those warmer waters influence weather patterns across North America. Although every El Niño event is different, Minnesota can experience periods of increased atmospheric moisture and stronger thunderstorms during portions of the severe weather season.
That does not guarantee more hail every year. However, it does reinforce the importance of preparing homes before severe weather develops.
The National Weather Service Hail Safety Guide provides helpful information about hail formation and storm safety for homeowners.
Small Damage Can Become Large Repairs
Roofing systems work together to keep moisture outside the home. Once hail compromises even one component, water has additional opportunities to enter the structure.
Over time, untreated damage may affect:
- Roof decking
- Attic insulation
- Ventilation systems
- Ceilings
- Interior walls
- Structural framing
- Mold prevention systems
Therefore, addressing roof damage promptly usually costs far less than repairing interior water damage later.
Repair or Replace? Making the Right Decision

One of the most common questions homeowners ask after a hailstorm is whether the roof needs repair or complete replacement. The answer depends on several factors. These include the roof’s age, the extent of the damage, the condition of the underlying materials, and whether the damage affects isolated areas or multiple roof slopes.
Repairs may be appropriate when:
- Damage is limited to a small section of the roof.
- The remaining shingles are in good condition.
- Matching shingles are still available.
- The roof has many years of expected life remaining.
Replacement may become the better investment when:
- Damage affects several roof planes.
- The shingles are nearing the end of their lifespan.
- Granule loss is widespread.
- Multiple repairs have already been completed over the years.
- The roof has experienced repeated hailstorms.
A professional inspection provides the information needed to make a confident decision instead of relying on guesswork.
Modern Roofing Materials Offer Better Storm Protection
Today’s roofing products continue improving every year. Many manufacturers now produce impact-resistant shingles that are specifically engineered to withstand larger hailstones and stronger winds.
Although no roofing material is completely hail-proof, newer products often provide:
- Greater impact resistance
- Improved wind ratings
- Longer manufacturer warranties
- Better granule adhesion
- Enhanced curb appeal
- Improved energy efficiency
For homeowners replacing an older roof, upgrading to newer materials can provide additional peace of mind during future storm seasons.
Why Documentation Matters After a Storm
Many homeowners focus only on visible roof damage. However, documenting the condition of the roof immediately after a hailstorm can be extremely valuable.
Take photographs of:
- Roof surfaces visible from the ground
- Dented gutters and downspouts
- Damaged siding
- Roof vents
- Window trim
- Tree damage around the property
These photographs create a timeline of the storm’s impact and help track any changes that develop over the following weeks or months.
Do Not Forget the Rest of the Exterior
Hail rarely damages only the roof. The same storm that strikes shingles often affects other exterior components as well.
During a complete inspection, professionals also examine:
- Soffit and fascia
- Roof flashing
- Gutters and gutter guards
- Chimney flashing
- Roof vents
- Skylights
- Siding
- Exterior trim
Finding all storm-related damage during one inspection allows homeowners to develop a complete repair plan instead of discovering new problems months later.
Why Professional Roof Inspections Provide Greater Value
Walking around your home after a hailstorm is a good first step. However, many roofing problems simply cannot be seen safely from the ground.
Professional roofing contractors understand how hail affects different roofing systems. They recognize subtle bruising, hidden fractures, weakened seal strips, and granule loss that most homeowners would never notice.
Additionally, experienced inspectors evaluate the entire roofing system rather than focusing only on damaged shingles. Flashing, ventilation, valleys, ridge caps, and drainage components all work together to protect your home.
That complete evaluation provides homeowners with a much clearer understanding of the roof’s condition and expected remaining lifespan.
Protect Your Investment Before the Next Storm
Waiting until water appears inside the home often means damage has already spread beneath the roofing system. By then, repairs may involve insulation, drywall, framing, or other structural components in addition to the roof itself.
Scheduling an inspection after significant hail allows problems to be identified while they are still relatively small. That proactive approach often reduces repair costs while extending the life of the roof.
If you believe your home may have experienced recent hail damage, visit our Roofing Services page to learn more about professional inspections, repairs, and replacement options available throughout Ramsey and the surrounding communities.
Trust 1st Choice Remodeling After Severe Weather
Storm damage is stressful enough without wondering whether hidden roof problems remain. Our experienced team helps homeowners understand the condition of their roof and provides honest recommendations based on the actual damage—not unnecessary replacements.
Whether your roof requires a simple repair or a complete replacement, we are committed to quality workmanship and long-lasting results.
For additional remodeling tips and homeowner resources, visit our Blog Page.
Schedule Your Roof Inspection Today
Do not wait for a small hail bruise to become a costly roof leak. If your neighborhood recently experienced severe weather, now is the ideal time to have your roof professionally inspected.
Contact 1st Choice Remodeling today to schedule your professional roof inspection. We’ll help you identify storm damage early, protect your investment, and keep your home ready for whatever Minnesota weather brings next.
![]()
Authored by 1st Choice Remodeling | Published July 2026